
In order to edit a specific product, you need to go to your site settings, select the “Products” (1) tab in the left menu and then either click on the name of a product (2) or on the three-dots button and then select the “Edit” (3) option.

General product settings
The first tab, “General Settings”, allows you to edit basic information such as product name, description, price, availability, and so on.
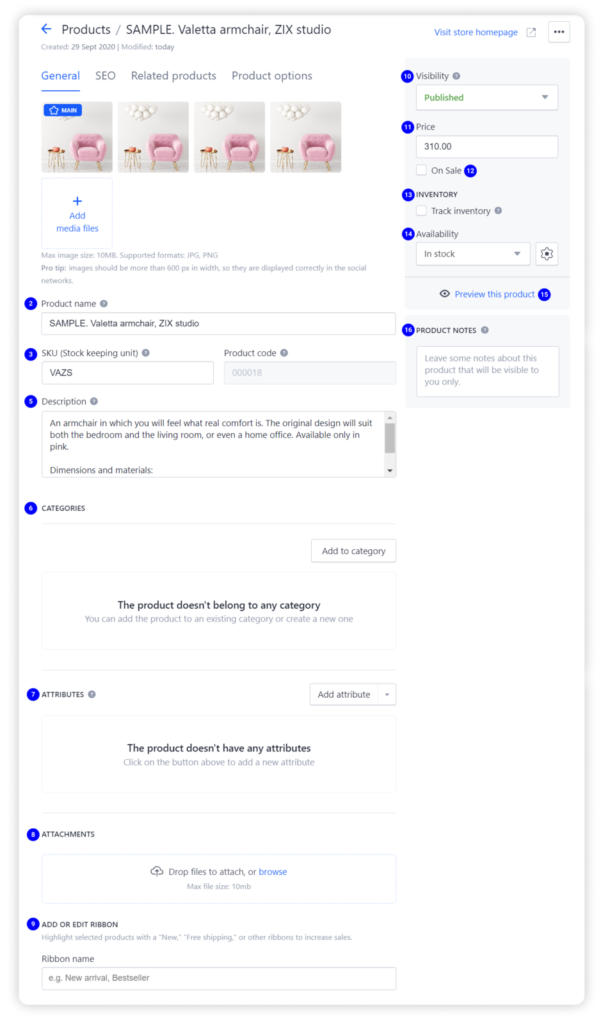
- At the top of the general settings (1), you can add images and videos of the selected product. To add a video, you need to click on “Add media files”, go to the second tab and insert a link to the video that was previously posted on the Youtube or Vimeo platform. Direct download of video files is not supported.
- In the field “Product name” (2) you can edit the very name of the product item, which will then be displayed on your site.
- The fields “SKU” (3) and “Product code” (4) are identification codes that can be used to search for a product. The SKU is set manually and is used only by the site owner in the store settings. The product code is generated automatically and can be used by buyers directly on the site.
- In the “Description” field (5), you can set a short description of the product, which will then be displayed on the product page on the site. The field only supports paragraph and indent formatting; the application of styles (for example, italic, underline, bold) is not yet available.
- In the “Categories” section (6) you can add the selected product to one or more categories. Pay attention to the fact that after adding a product to a category, it will no longer be displayed on the main page of the store and will be visible to users only after switching to the selected category.
Tip: If you need to add a large number of products to one category at once, you can do this by bulk editing in the product list. To do this, select the desired products with a tick and place them in the category through the drop-down menu “Actions with the product”.
- “Attributes” (7) section allows you to edit the attributes for this product. Standard attributes are: Brand, Age group, Gender. You can also add custom attribues. You should add attributes if you intend to use sales channels, such as Google Merchant Center or Facebook Commerce Manager.
- In the “Attachments” section (8) you can upload any files, for example, instructions, presentations, promotional materials, etc., to provide buyers with more detailed information about the product being sold.
- In the “Add or edit ribbon” section (9), you can create one or more badges for the selected product, for example, “Hit of the season”, “New” or “Sale”, which will be displayed in the product card on the site.
Tip: All badges are displayed in the boxes in the upper left corner of the product card by default, but this can be changed in the “Settings” section of the store. Click on the “Customize View” button to quickly navigate to the corresponding settings.
- The drop-down menu “Visibility” (10) regulates the display of the product on the site. Select the option “Draft” to hide the product, or “Published” to display the product on the site. Please note that the “Draft” option does not remove the product from your store, it only hides it from your customers.
- The “Price” field (11) allows you to set the cost of the product.
- “On sale” (12) allows you to set a discount from the price as a percentage or a fixed amount. The published site will display two prices: the old one (crossed out) and the new one with a discount.
- “Track inventory” toggle (13) allows you to track the inventory for this product.
- The drop-down menu “Availability” (14) allows you to specify the status of the product item. Available options for availability:
- – In stock – the product is in stock and available for purchase on the website. The product is also displayed in the sitemap. This status is added by default for new items in your store.
– Out of stock – the product is out of stock and is not available for purchase on the website. It does not appear in the sitemap. The product is visible on the published site at the end of the catalog, regardless of sorting.
– Pre-order – the product is out of stock and it will not appear until you order it. Most often, this status is used for unpopular goods with irregular deliveries. A product with this status is available for ordering on the site and is displayed in the sitemap.
– Coming soon – this item is temporarily out of stock, but coming soon. This status is used for products that are in high demand among buyers and are sold out faster than they appear from the seller. We recommend using this status if you want to warn the visitor that the product will be available in the warehouse in any case, just without instant delivery, so that the buyer does not go to the site of your competitors. Products with the “Expected” status are displayed in the sitemap.
Tip: All status names are created in English by default, however they can be edited in the “Settings” section of the store. Click on the gear button next to the “Availability” drop-down list to quickly access these settings.
- The “Preview” button (15) will take you to the page of this product in your online store. Thus, you can see exactly how all the data that you entered in the product settings is displayed.
- The “Product Notes” field (16) allows you to add useful notes to help you keep important item information such as supplier information, purchase price, special conditions of sale, and so on
Important: After making changes to the general settings, do not forget to click on the “Save” button at the top of the screen or press Ctrl/Cmd + S to apply the changes!
Tip: Duplication or deletion of the selected product is available through the three-dots button in the upper right corner.